Sarah & Nick
  • Home
  • About Us
  • Categories
    • Home
    • DIY
    • Travel
    • Recipes
    • Wedding
    • Odds & Ends
  • Shop
    • Home
      • Bedroom
      • Bathroom
      • Guest Bedroom/Home Office
      • Living & Dining Room
      • Music Room
      • Exterior & Porch/Patio
      • Basement
    • Tools
    • Lifestyle
      • Beauty
      • Fashion
      • Everything Else
  • Features

I'll be the first person to admit that our kitchen is ugly. Even worse, it's the kind of ugly that, as renters, we can't really do anything to change (i.e. the cabinet color = the wall color = the countertop color = the floor color. And that color is beige.)

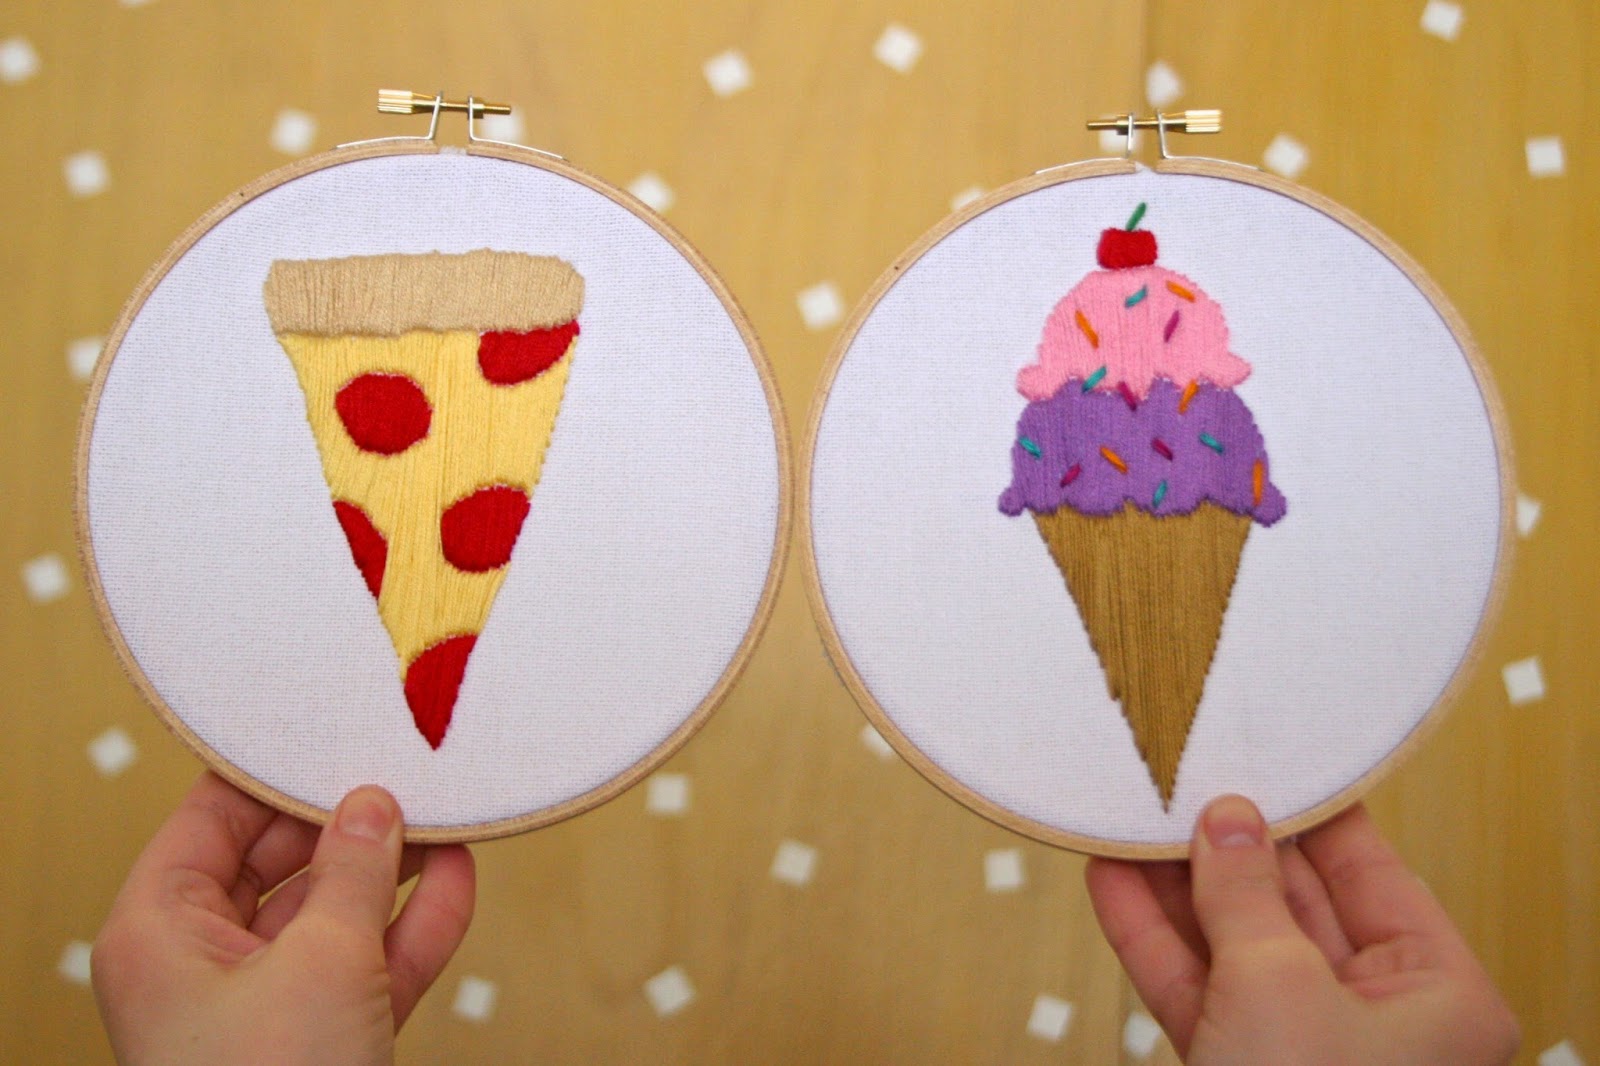
Lately I've had the urge to do anything that can make our kitchen even the tiniest bit cuter, and that's where this project comes in. Ever since making this embroidered heart locket I've been pretty pumped about how easy and inexpensive it can be to make some fun embroidery. Our kitchen doesn't have a ton of wall space, but there's a bit of room for small art, so what better to hang up than some fun food embroidery?!


Here's what I used!
- Embroidery hoops
- Embroidery cloth
- Embroidery floss
- Needle
- Scissors
- Pencil

Here's what I did!
- First I did a free-hand sketch of the pizza and the ice cream cone on my embroidery cloth. If you'd prefer not to free-hand, you could print out photos to trace.
- Insert cloth into embroidery hoop. Using needle and embroidery floss, embroider the pattern, following the pencil outline. I worked from top to bottom, left to right.
- Once finished, knot floss tightly in the back. Ensure that your embroidery is centered in your hoop where you want it. Trim the extra cloth off the back, and you're done!


I made an ice cream cone and pizza slice to start, but I think I might add a cheeseburger too. Is it ironic that I don't actually eat any of these things in their true form? Possibly, but I just can't deny their cuteness.


Sarah & Nick
x


I am a bit of a peanut butter freak. Or rather, I'm a complete and total peanut butter freak. I think I'd put peanut butter on just about anything if Sarah would let me. (Ok, maybe not everything, but I try to sneak it in where I can.) Luckily for me, while browsing Minimalist Baker, I stumbled across the answer to my peanut butter breakfast prayers: Peanut Butter Chocolate Granola!


Here's what you need:
- 3 cups + 2 tbsp. rolled oats
- 2 tbsp. sugar (we used coconut sugar, but you could use cane sugar or granulated)
- 1/4 cup coconut oil (you could also use grape seed or olive oil)
- 1/4 cup creamy peanut butter
- 1/4 cup agave nectar (you could also use maple syrup or honey, if you're into that)
- 1/3 cup vegan chocolate chips (we used Enjoy Life mini chips)

Here's what you do:
- Preheat oven to 340 degrees.
- In a medium bowl, combine your oats and sugar; set aside.


- In a small sauce pan, melt together the peanut butter, coconut oil, and agave.


- Pour the peanut butter mixture over your oats and mix well.


- Spread evenly into two cookie sheets.
- Bake for about 20 minutes or until golden brown. After 10 minutes, stir to make sure they brown evenly. Check every few minutes after that to make sure they're not burning. (The more they brown, the quicker they brown, so keep a close eye on them!)


- After you take the oats out of the oven, allow them to cool completely before adding in your chocolate chips. (The recipe calls for 1/3 cup chocolate chips, but if you're like me, you'll be standing over the bowl secretly adding more and more chips while your girlfriend isn't looking...)


We like to enjoy this in a bowl with some almond milk, or to just munch as a dry snack. It has a fantastic, rich taste that I just absolutely love! Next time we make this, we're definitely doubling it... or tripling it--I can't seem to get enough of the classic peanut butter and chocolate combo!

Sarah & Nick
x

Today's a big day for us - we're sharing our first guest post ever! Today you're going to hear from our super adorable and awesome friend Madeline! She made some amazing holiday garlands that you're going to want in your home ASAP. So grab a drink, a few chocolates, and spend Galentine's Day making your home as cute as can be. Okay, take it away, Maddy!

Hi! My name is Madeline and I’m Sarah and Nick’s real life friend. I say it that way because at one point, Sarah and I were mere internet friends. The horror! It was a biggg step to go to that next level of friendship, but we did it! Yay! Sarah and I bonded over music, beer, and crafts…probably our three favorite things. I wanted to stop by to give you a little look into my crafty little world in Lancaster, PA! I hope you enjoy this guest post. Cheers!

Decorating for the holidays. Something I always want to do, but I’m not willing to spend a ton of money on doing. A Christmas tree? Yes. A million hearts and wreaths and cutesy items? Not so much. Though, admittedly, I do love cutesy items. So instead, I decided to make a few garlands that I could reuse for other holidays or events. And I’m game for anything involving felt, so here you go!

Felt Bead Garland
The top garland is a felted necklace I was eying up for a while and eventually purchased from Paper Source. I was constantly looking for felted beads/balls and always disappointed at how expensive they were. I was also not happy about wool prices and how much effort is involved in making felted wool balls. So, I purchased this necklace for $12.95, deconstructed it and reconstructed it into one long strand using a needle and thread. I love this and will definitely be leaving it up for a long time (read: forever).

Felt Strip Garland
The middle garland is an Anthropologie-inspired piece. Again, it’s made out of felt, so creating this myself was a no-brainer.


What you’ll need:
- Felt (I used 8 different colors)
- Scissors
- Needle
- Embroidery Floss

What you'll do:
- Cut each piece of felt into little strips. Don’t be afraid to cut them all different widths and lengths. It adds some interesting character to the garland.


- Now it’s time to start stringing them together. I like to pinch each one in half and thread the needle through twice, like this…


- So, after you thread a bunch, your garland will start looking like this.


- Keep going until it’s your desired length. Mine is an arm’s length and a half, which didn’t take too long to string.

"XOXO" Garland
Now, the third garland, xoxoxo, is my favorite!

What you’ll need:
- Felt
- Scissors
- Needle
- Embroidery Floss
- Printed Letters (I found these on Pinterest, and I thought they’d be perfect for this project. I clearly just used the “x” and the “o,” but you can spell out whatever you’d like!)

What you'll do:
- I cut out each letter and traced them onto felt. Again, I used several different colors. Cut out each letter and lay them out in a color order you like best.


- Now it’s time to string them together. I used one little loop through both letters to secure them together. Here you can see me sewing them together in my sweatpanted craftland glory.


- Once you have sewed each letter to its neighbor, add a loop of thread to each end for easy hanging. And then, hang ‘em all up, take a step back and admire your gorgeous garlands.


I think the layered look is so great and festive. Throw in a string of lights if you’re feeling wild! I’m planning on making a couple more lettered garlands in the (very) near future. The world is my oyster, ya know? I hope you enjoyed getting a little peek into my mantel area and how I like to decorate it!

Madeline + (Sarah & Nick)
x

For those of you that easily lose track of time/days/holidays like me, here's a quick reminder: Valentine's Day is coming up! Now, of all the holidays of the year, Sarah and I don't really indulge too much in Valentine's Day. That being said, ANY holiday is a good enough excuse for Sarah and I to whip up an awesome, tasty treat!


Chocolate covered strawberries are a Valentine's Day staple, but can be pretty pricey and typically aren't vegan. Luckily, we stumbled across this fantastic chocolate strawberry puppy chow recipe from Your Cup of Cake and it's oh so good! What's not to love? Chocolate + strawberry + puppy Chow = delicious.


Here's what you need:
- 7 cups rice Chex cereal
- 2 cups regular or vegan chocolate chunks/chips (We use Enjoy Life dairy-free chocolate)
- 1 cup strawberry cake mix (Duncan Hines is vegan, so that's what we use!)
- 1/2 cup powdered sugar
- Pink sprinkles or other decorations for topping


Here's what you do:
- In a medium glass bowl, melt your chocolate chunks until nice and smooth. We melted ours in the microwave, but you could melt them on the stove top if you wanted.


- In a separate bowl, combine cake mix, powdered sugar, and sprinkles.
- In a third, large bowl, Combine rice Chex cereal and melted chocolate until Chex are evenly coated with the chocolate.


- Add the powdered cake mixture, and toss until evenly coated. These last two steps get a bit messy, be careful to not crush all your chex, or to fling them out of your bowl!


That's it! One of the really great things about a good puppy chow recipe is how easy it can be. Oh, and how delicious it can be, I guess... I hope this gives everyone some incentive to make a special treat for the upcoming holiday. Do you have any other good Valentine's Day recipes you like to make? Please share them with us below! (If you prefer cookies, don't forget to try our Strawberry & Red Velvet Cake Cookies!)


Sarah & Nick
x
Newer Posts Older Posts Home

HI THERE

We're Sarah & Nick. Here we like to talk about renovating our 1950s ranch in Pittsburgh, traveling the world, and the odds and ends in between.

SUBSCRIBE & FOLLOW

SEARCH

BLOG ARCHIVES

  • ►  2021 (3)
    • ►  August (1)
    • ►  May (1)
    • ►  March (1)
  • ►  2020 (3)
    • ►  August (1)
    • ►  April (1)
    • ►  February (1)
  • ►  2019 (3)
    • ►  December (1)
    • ►  June (1)
    • ►  April (1)
  • ►  2018 (7)
    • ►  December (1)
    • ►  October (1)
    • ►  May (1)
    • ►  April (2)
    • ►  February (2)
  • ►  2017 (28)
    • ►  December (3)
    • ►  November (1)
    • ►  October (1)
    • ►  September (3)
    • ►  July (2)
    • ►  June (1)
    • ►  April (2)
    • ►  March (6)
    • ►  February (1)
    • ►  January (8)
  • ►  2016 (49)
    • ►  December (3)
    • ►  November (5)
    • ►  October (4)
    • ►  September (4)
    • ►  August (4)
    • ►  July (3)
    • ►  June (4)
    • ►  May (2)
    • ►  April (5)
    • ►  March (4)
    • ►  February (7)
    • ►  January (4)
  • ▼  2015 (36)
    • ►  December (5)
    • ►  November (4)
    • ►  October (3)
    • ►  September (2)
    • ►  August (6)
    • ►  July (3)
    • ►  May (2)
    • ►  April (3)
    • ►  March (2)
    • ▼  February (4)
      • Embroidered Food Art
      • Peanut Butter Chocolate Chip Granola
      • DIY Holiday Garlands
      • Chocolate Strawberry Puppy Chow
    • ►  January (2)
  • ►  2014 (36)
    • ►  December (6)
    • ►  November (5)
    • ►  October (3)
    • ►  September (3)
    • ►  August (4)
    • ►  July (2)
    • ►  June (3)
    • ►  May (1)
    • ►  April (2)
    • ►  March (4)
    • ►  February (2)
    • ►  January (1)
  • ►  2013 (1)
    • ►  November (1)
© Creative Worker Bee. Powered by Blogger.

DISCLOSURE

We participate in various affiliate advertising programs. If you click or make a purchase through select links on this site or related social media accounts, we may receive a commission. Although we participate in these programs, we're committed to keeping this blog 100% us - all opinions are our own.

Copyright © Sarah & Nick. Designed by OddThemes