Sarah & Nick
  • Home
  • About Us
  • Categories
    • Home
    • DIY
    • Travel
    • Recipes
    • Wedding
    • Odds & Ends
  • Shop
    • Home
      • Bedroom
      • Bathroom
      • Guest Bedroom/Home Office
      • Living & Dining Room
      • Music Room
      • Exterior & Porch/Patio
      • Basement
    • Tools
    • Lifestyle
      • Beauty
      • Fashion
      • Everything Else
  • Features

I've never been a huge popcorn guy. Sarah is literally popcorn obsessed, so I've been trying to meet her halfway. Generally speaking, once I start eating popcorn, I'm into it - I won't stop and I won't complain. But cover that popcorn in chocolate and Oreos? I'll be throwing elbows and pushing children over to get to the bowl. This stuff is addicting, delicious, and luckily very easy to make!


Here's what you need:
- 1/2 cup unpopped popcorn kernels
- 1/2 cup chocolate chips (we used Enjoy Life dairy-free chips)
- 10 Oreos, crushed


Here's what you do:
- Crush Oreos by hand in a large Ziplock bag, or my personal favorite: a slap chop! Leave some large chunks. Set aside.
- Add your popcorn kernels to a large microwave safe bowl and cover with a microwave safe plate. Pop for about 5 minutes. All microwaves are different, so listen for the popping of your corn to stop.
- Carefully remove bowl from the microwave (it will be very hot!) Once cooled, separate out unpopped kernels.
- In a separate small bowl, melt chocolate chips in microwave, stirring occasionally until it's "drizzle-able." (New word. I made it up.)
- In a large bowl, combine your popcorn, melted chocolate, and crushed Oreos. Carefully stir until well coated.
- Let cool and enjoy! Or, enjoy warm! Much of this didn't even make it out of the bowl we made it in.


Obviously, Sarah and I pop our own popcorn in the microwave, but you don't need to do it this way. By all means, get your paws on some popcorn anyway you can. Do it on the stovetop, use a microwavable bag, an air popper, buy it ready to eat, whatever! Also, why stop at chocolate and Oreos? You can customize this delicious dish to be as awesome as you want - add peanuts, candy, pretzels, or anything else you can dream up!


I really hope you get a chance to make some of this on your own, and if you come up with some mind-blowing combination of toppings, be sure to share it with us!

Sarah & Nick
x

I've been getting the itch to knit lately, but I thought it was getting late in the season to be making more blankets that we'd just end up packing away soon. I've seen a lot of cute floor poufs online lately and thought I'd try to knit my own!


This floor pouf was super easy to make, so if you know how to cast on, knit, and cast off, you can make one too! As this was my first floor pouf, there's definitely some things I'd do differently next time. 1) I'd make my pouf quite a bit bigger. It turned out way smaller than I expected. 2) I'd knit in the round instead of sewing the two ends together. The seam isn't very pretty and a seamless circle would have been the better way to go.


Want to make your own? Here's what you need!)
- Thick yarn (I used Bernat Baby Blanket Yarn in Vanilla)
- Size 15 circular needles
- Sewing needle with large eye
- Bean bag filler
- Trash bag


Here's what you do!
- Cast on 35 stitches.
- Knit each row until you have a rectangle about 3' long. Cast off.
- Using a sewing needle, sew the two ends of your rectangle together with spare yarn. You should now have a large "tube".
- On the bottom of your pouf, thread your needle through a loop at the end of a row. Continue to thread through every second loop, pulling your yarn tightly to bunch the bottom together. If there's a small hole, carefully sew it together and tie off your yarn.
- Your pouf should now be like a basket. Insert a trash bag filled with your bean bag filler until basket is full.
- Following the same technique as the bottom of the pouf, use your sewing needle and yarn to tighten the top together. Sew together the small hole and tie off your yarn.


Easy, right? You could completely customize this pattern to your liking - change the size, type of stitch, etc. I'm excited to try different techniques to make more floor poufs for our apartment! Think you'll make one too?

Sarah & Nick
x

Ever since Sarah and I went to The Wizarding World of Harry Potter back in July, we've had butterbeer on the brain. While watching the movies or reading the books, the thought of enjoying a nice butterbeer is always so enticing. It seems like the ultimate indulgent, slightly alcoholic drink to enjoy with friends for a relaxing evening.

The taste of the frozen butterbeer at Harry Potter World did NOT disappoint, and since then Sarah and I have been on a quest to make our own. Here's our take on a delicious boozy (and vegan!) butterbeer cocktail!


Here's what you need:
For the butterbeer:
- 12 oz. cream soda
- 1/4 tsp. rum extract
- 3/4 tsp. butter extract
- 3/4 oz (1/2 shot) butterscotch schnapps
- 1.5 oz (1 shot) spiced rum

For the whipped topping:
- 1 15 oz. can coconut milk
- 3/4 cup powdered sugar
- 1/4 tsp. rum extract


Here's what you do:
To make the whipped topping:
- Open your can of coconut milk. Be sure not to shake it, as you do not want to combine the solid and liquid parts. Scoop the solid milk into a mixing bowl. Save the water in the can, as you will add some back later.
- Add powdered sugar and rum extract to your milk. Mix until fluffy and combined.
- Spoon in small amounts of the leftover water at the bottom of the coconut milk can to thin out the topping to your liking.


To make the butterbeer:
- Combine all ingredients in a cocktail glass of your choice.
- Top lightly with your whipped topping. The topping will float if you ladle it on gently.
- Add a fun paper straw and enjoy!


As the carbonation of the cream soda starts to interact with the coconut whipped topping, you'll notice it foam up, much like a root beer float. The more you mix it, the more it foams up! Of course, to make butterbeer without the booze, just... don't add the booze! It's still really delicious!

We never thought we'd be able to create a close replica of the delicious butterbeer we had at The Wizarding World, but this recipe definitely does it! I think next we're going to make butterbeer floats. They'll be perfect to sip in July while we're reading Harry Potter and the Cursed Child! (OHMYGODWECAN'TWAIT.)

Hogwarts house coasters made by our friend Shannon!

We hope you get a chance to enjoy this awesome recipe!

Sarah & Nick
x

Nick and I aren't really big Valentine's Day people. But you know what we are? BIG PIZZA PEOPLE. As evidenced by our recent Chicago Pizza Tour and just general pizza ordering habits (which are weekly.)


For Valentine's Day the past several years, we've usually just watched movies and picked up "heart shaped" pizzas from a pizza place. "Heart shaped" in quotations because more often than not they're just round with a little nip in the top. Recently I had a light bulb moment and realized "We should make our own heart shaped pizzas!" and then "AND MAKE THEM MINI!"


We're just going to eat these from the comfort of our couch while we binge watch 'The Knick', but they'd also be perfect for a make-your-own-mini-pizza party! Grab different sauces, a variety of toppings, and have a fun little party with the people you love. Sounds good, right? So you want to make them too?


Here's what you need! (Makes about 16-18 mini pizzas)
- 1 package (2.25 tsp.) active dry yeast
- 1 cup warm water
- 2.5 cups flour
- 2 tbsp. vegetable oil
- 1 tsp. sugar
- 1 tsp. salt
- Pizza toppings of your choice
- Heart shaped cookie cutter


Here's what you do!
- Preheat oven to 375°.
- In a large bowl combine yeast and warm water. Allow to bloom for five minutes.
- Add remaining dough ingredients. Combine well and let rest for five minutes.
- Turn dough onto a floured surface. The dough will be really sticky, so be liberal with extra flour.
- Knead the dough, adding flour as needed. Continue until stickiness is gone and dough can be stretched and rolled flat. Roll thin with a rolling pin.
- Use a heart shaped cookie cutter to cut small crusts. Transfer to a greased baking sheet. Top with sauce, cheese, etc. as desired.
- Bake at 375° for 15-20 minutes until cheese starts to brown and bubble.


Thanks to my Galentine, Shannon, who helped me with pizza prep and as my hand model while Nick was in class last weekend! Our taste testing proved that these will most definitely be on the V-Day menu for this weekend. Think you'll make them too?

Sarah & Nick
x

Do you ever live with a piece of furniture for so long that it never even crosses your mind, but then one day you look and realize, "Wow, that is so ugly. Why do I have that?" That's the story of me and our vinyl record shelf.


But recently I saw this shelf with new eyes and decided it has got to go. The bookshelf that was holding our records came from my childhood bedroom. It was cheap, flimsy, and certainly not doing us any favors.


I knew right away what I wanted our new record shelf to look like: crisp, white, sturdy, and elevated off the floor with some fun legs. I know IKEA is a great resource for shelving units, so I searched their site until I found the KALLAX shelving unit in white. We live pretty close to an IKEA, but we instead ordered online, as shipping was only $10 (good to know for those that don't live close to IKEA!)


Once we picked the shelving unit, I immediately envisioned some stained, mid-century modern wooden legs. We purchased the Waddell 7.5" Round Taper Legs from Home Depot, along with the corresponding mounting plates. We stained the legs in Minwax Early American, as we've used this stain on other projects and really like the color. Plus we already had plenty on hand for an upcoming project that we'll tackle in the spring.


Assembling the shelf was super simple and only took maybe 15 minutes. Then we laid out the mounting plates on the bottom of the shelf and marked where the screws would go. Nick drilled small pilot holes for the screws, and then attached the plates with the drill. The final step was to screw the legs into the plates and we were done!


Our new record shelf is approximately one million times better than the old one. Like, how did it not occur to us that it looked like our furniture came from a dorm room? This new shelf is beautiful, clean, and sophisticated. Now whenever I walk by I do a double take because this baby is just so dang gorgeous.


Shop the post:


Sarah & Nick
x
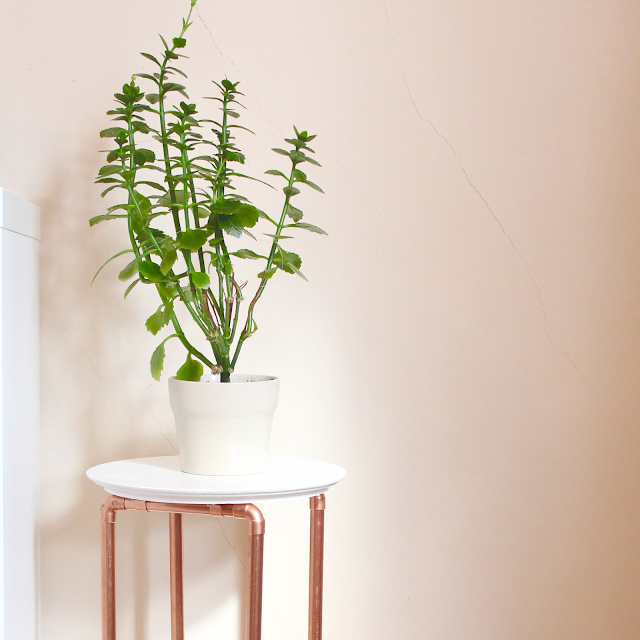
DIY Copper Leg Plant Stand

Is it ok to consider plants your placeholder for pets? I've never really thought about this before, but we're not allowed pets in our apartment, and it seems that somehow, in the blink of an eye, Sarah and I have acquired quite a few plants. It's almost as if they're multiplying. I don't remember buying all these plants.*

*Editor's Note: It's because we didn't buy them. We smuggled them home on a plane from San Francisco.

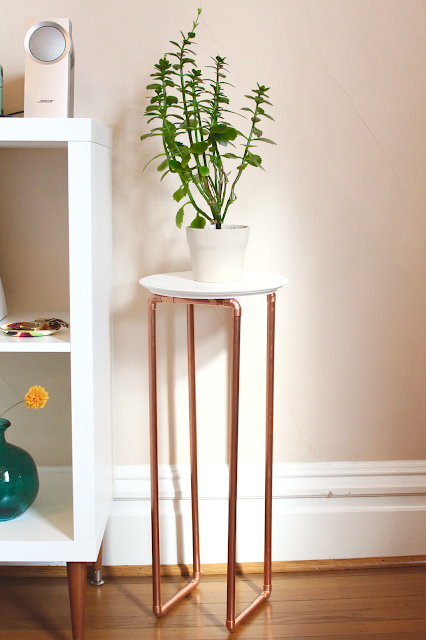
Anyway, regardless of how many plants we do or do not have, we certainly need a place to put them! Our apartment isn't huge, and we don't have many windows with sills big enough for plants. We need a stand that raises the plant up to catch some of the sun's precious rays, but doesn't take up too much space. Viola! Copper leg plant stand to the rescue.

DIY Copper Leg Plant Stand

There are tons and tons of versions of similar plant stands like this out there on the web, but here is Sarah's and my simple little version.

DIY Copper Leg Plant Stand

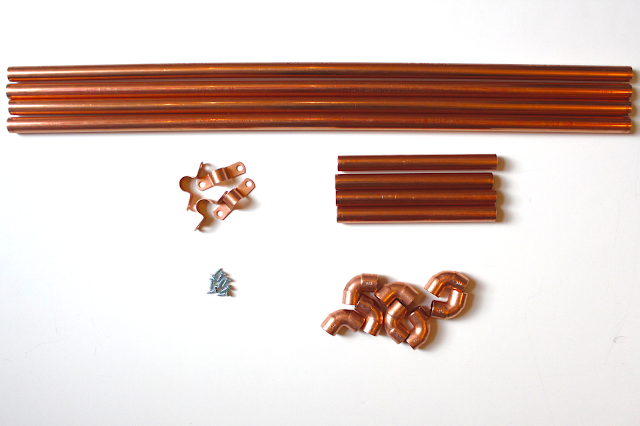
Here's what you need:
- 1/2" diameter copper pipe (4 pieces 2' long, 4 pieces 6" long)
- 1/2" 90° elbow joints (8 pieces)
- 1/2" copper braces/straps (4 pieces)
- 8 small screws
- Piece of circular wood (we used a clock face)
- Wood putty or filler, if needed
- Pipe cutter
- Paint of your choice

Home Depot sells 1/2" copper pipe in 10 foot segments. We decided on the dimensions above knowing we could get it all from a single piece. You can either cut the pieces to size at home with a pipe cutter, or a Home Depot employee can cut it to these lengths for you right then and there.

Here's what you do:
- If you're using a clock face like we did, use wood putty or wood filler to fill the hole in the middle.
- Paint your wood with color of your choice.

DIY Copper Leg Plant Stand

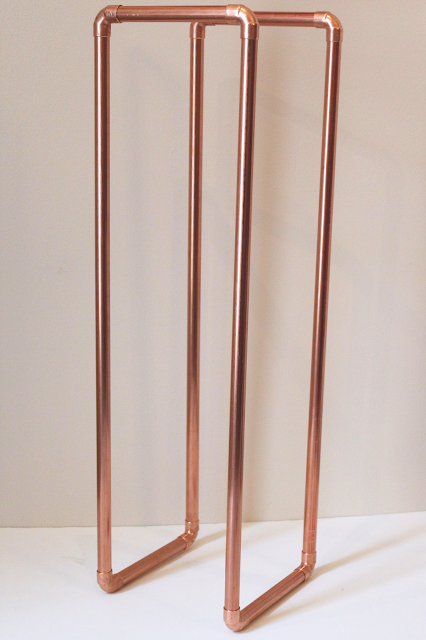
- To assemble the pipe, we made what I'm calling an "infinity U." I'm wondering if you can figure out what shape I mean by this (to me, it is very descriptive.) If not, just look at the pictures and replicate the shape!
- Our joints all fit very snug (some even needed to be hammered in the whole way) so we didn't use any glue or adhesives. If your joints seem loose, add super glue to the ends of your pipes to keep them secure. Wipe away excess glue.

DIY Copper Leg Plant Stand

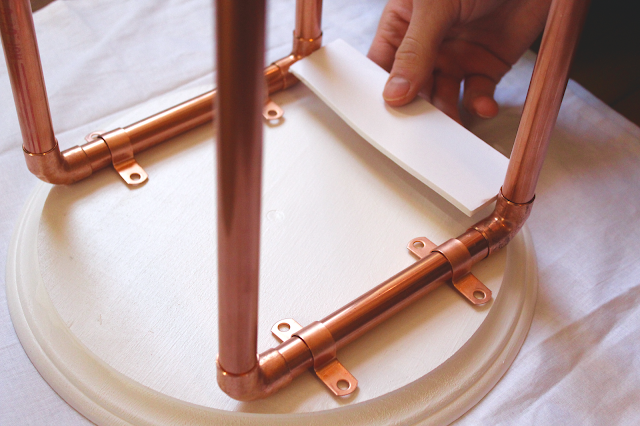
- Place your pipe legs on the bottom of your wooden circle, and mark the correct spots for your braces to be attached. We used a 6" spacer made out of foam board to make sure the pipe legs ran parallel from top to bottom.

DIY Copper Leg Plant Stand

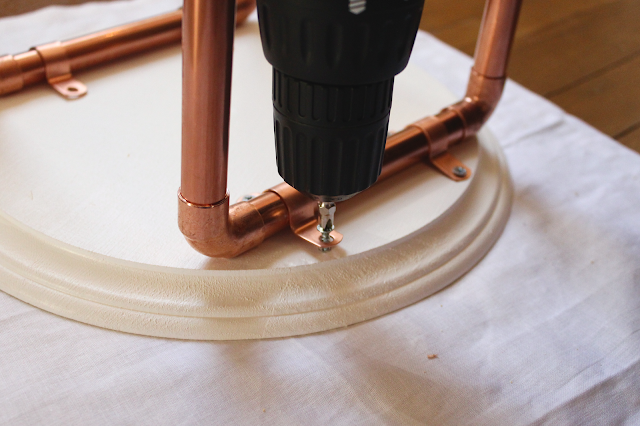
- Drill pilot holes before attaching the pipe with the braces to avoid splitting your wood.
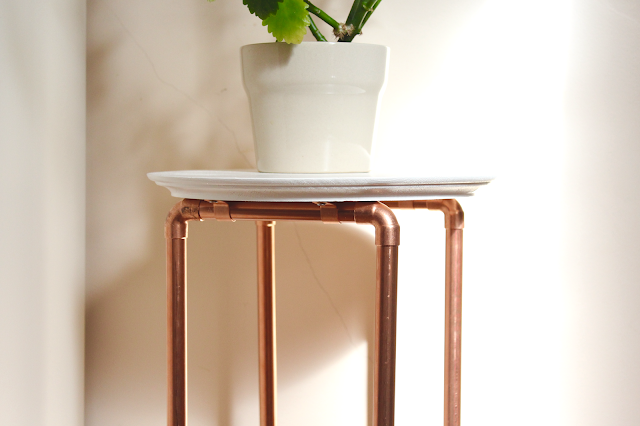
- Set it up and you're done!

DIY Copper Leg Plant Stand

I really love how this turned out: sleek, effective, beautiful, and clean. It's already got a perfect home sitting in some of the only sunlight coming in our apartment. I think the other plants are getting jealous.

Shop the post:


Sarah & Nick
x

It's not often that I have a day off from work, yet Nick still has school. Days where I'm home alone are always super productive for me, and I almost always squeeze some baking in. That's the story with these (vegan) banana crumb muffins from Minimalist Baker!


I tried out this recipe a couple months ago and they turned out SO good. They're simple to make, we always have the ingredients on hand, and that crumb topping just puts them over the edge. If you haven't already started checking your cabinets for the ingredients, you can go start now. It's no problem. I'll wait.

Here's what you need! (Recipe via Minimalist Baker, slightly modified by us)
Muffins:
- 2 flax eggs (1 flax egg = 1 tbsp. flax seed meal + 2.5 tbsp. water)
- 4 bananas (we've used both ripe and frozen (thawed) bananas)
- 1/2 heaping cup light brown sugar, packed
- 2 tsp. baking soda
- 1/2 tsp. sea salt
- 1/4 cup vegan butter, melted
- 1 tsp. vanilla extract
- 1.5 cups all purpose flour
- 1/2 cup oats
Crumb Topping:
- 1/4 cup coconut sugar
- 5 tbsp. all purpose flour
- 2 tbsp. vegan butter


Here's what you do!
- Preheat oven to 350 degrees and grease muffin tin.
- Add flax eggs to a large bowl and allow to sit for 5 minutes.
- Add bananas. Mash with fork/beaters and mix with hand-mixer until only a little texture remains.
- Add in brown sugar, baking soda, and sea salt. Mix with hand or stand mixer.
- Add in melted butter, vanilla, flour, and oats. Mix until just blended.
- Fill muffin tin until cups are about 3/4 full. You should be able to make 10-12 muffins.


- Either wipe batter bowl, or in a small bowl, add coconut sugar, flour, and vegan butter to create crumb topping. We find it easiest to combine with our fingers. Generously top each muffin.
- Bake for 17-22 minutes until golden brown. Serve warm! Store leftovers in an airtight container.


We hope that you make these muffins immediately because you will NOT regret it! Have a happy Monday!

Sarah & Nick
x
Newer Posts Older Posts Home

HI THERE

We're Sarah & Nick. Here we like to talk about renovating our 1950s ranch in Pittsburgh, traveling the world, and the odds and ends in between.

SUBSCRIBE & FOLLOW

SEARCH

BLOG ARCHIVES

  • ►  2021 (3)
    • ►  August (1)
    • ►  May (1)
    • ►  March (1)
  • ►  2020 (3)
    • ►  August (1)
    • ►  April (1)
    • ►  February (1)
  • ►  2019 (3)
    • ►  December (1)
    • ►  June (1)
    • ►  April (1)
  • ►  2018 (7)
    • ►  December (1)
    • ►  October (1)
    • ►  May (1)
    • ►  April (2)
    • ►  February (2)
  • ►  2017 (28)
    • ►  December (3)
    • ►  November (1)
    • ►  October (1)
    • ►  September (3)
    • ►  July (2)
    • ►  June (1)
    • ►  April (2)
    • ►  March (6)
    • ►  February (1)
    • ►  January (8)
  • ▼  2016 (49)
    • ►  December (3)
    • ►  November (5)
    • ►  October (4)
    • ►  September (4)
    • ►  August (4)
    • ►  July (3)
    • ►  June (4)
    • ►  May (2)
    • ►  April (5)
    • ►  March (4)
    • ▼  February (7)
      • Chocolate Oreo Popcorn
      • Knitted Floor Pouf
      • Boozy Butterbeer
      • Mini Heart Shaped Pizzas
      • Vinyl Record Shelf
      • Copper Leg Plant Stand
      • Banana Crumb Muffins
    • ►  January (4)
  • ►  2015 (36)
    • ►  December (5)
    • ►  November (4)
    • ►  October (3)
    • ►  September (2)
    • ►  August (6)
    • ►  July (3)
    • ►  May (2)
    • ►  April (3)
    • ►  March (2)
    • ►  February (4)
    • ►  January (2)
  • ►  2014 (36)
    • ►  December (6)
    • ►  November (5)
    • ►  October (3)
    • ►  September (3)
    • ►  August (4)
    • ►  July (2)
    • ►  June (3)
    • ►  May (1)
    • ►  April (2)
    • ►  March (4)
    • ►  February (2)
    • ►  January (1)
  • ►  2013 (1)
    • ►  November (1)
© Creative Worker Bee. Powered by Blogger.

DISCLOSURE

We participate in various affiliate advertising programs. If you click or make a purchase through select links on this site or related social media accounts, we may receive a commission. Although we participate in these programs, we're committed to keeping this blog 100% us - all opinions are our own.

Copyright © Sarah & Nick. Designed by OddThemes