Sarah & Nick
  • Home
  • About Us
  • Categories
    • Home
    • DIY
    • Travel
    • Recipes
    • Wedding
    • Odds & Ends
  • Shop
    • Home
      • Bedroom
      • Bathroom
      • Guest Bedroom/Home Office
      • Living & Dining Room
      • Music Room
      • Exterior & Porch/Patio
      • Basement
    • Tools
    • Lifestyle
      • Beauty
      • Fashion
      • Everything Else
  • Features

Living Room Evolution

Our House's Exterior

Guest Room/Office Makeover


It's been one year since we wrapped up our exterior painting project. You can read our full before & after post here, but the TLDR is that we (by hand) painted our yellow brick ranch with Romabio Limewash in Bianco White. As people discover our original post sharing our experience, I've understandably started to receive questions about how our painted brick is holding up, so I'm here today to give a little update.

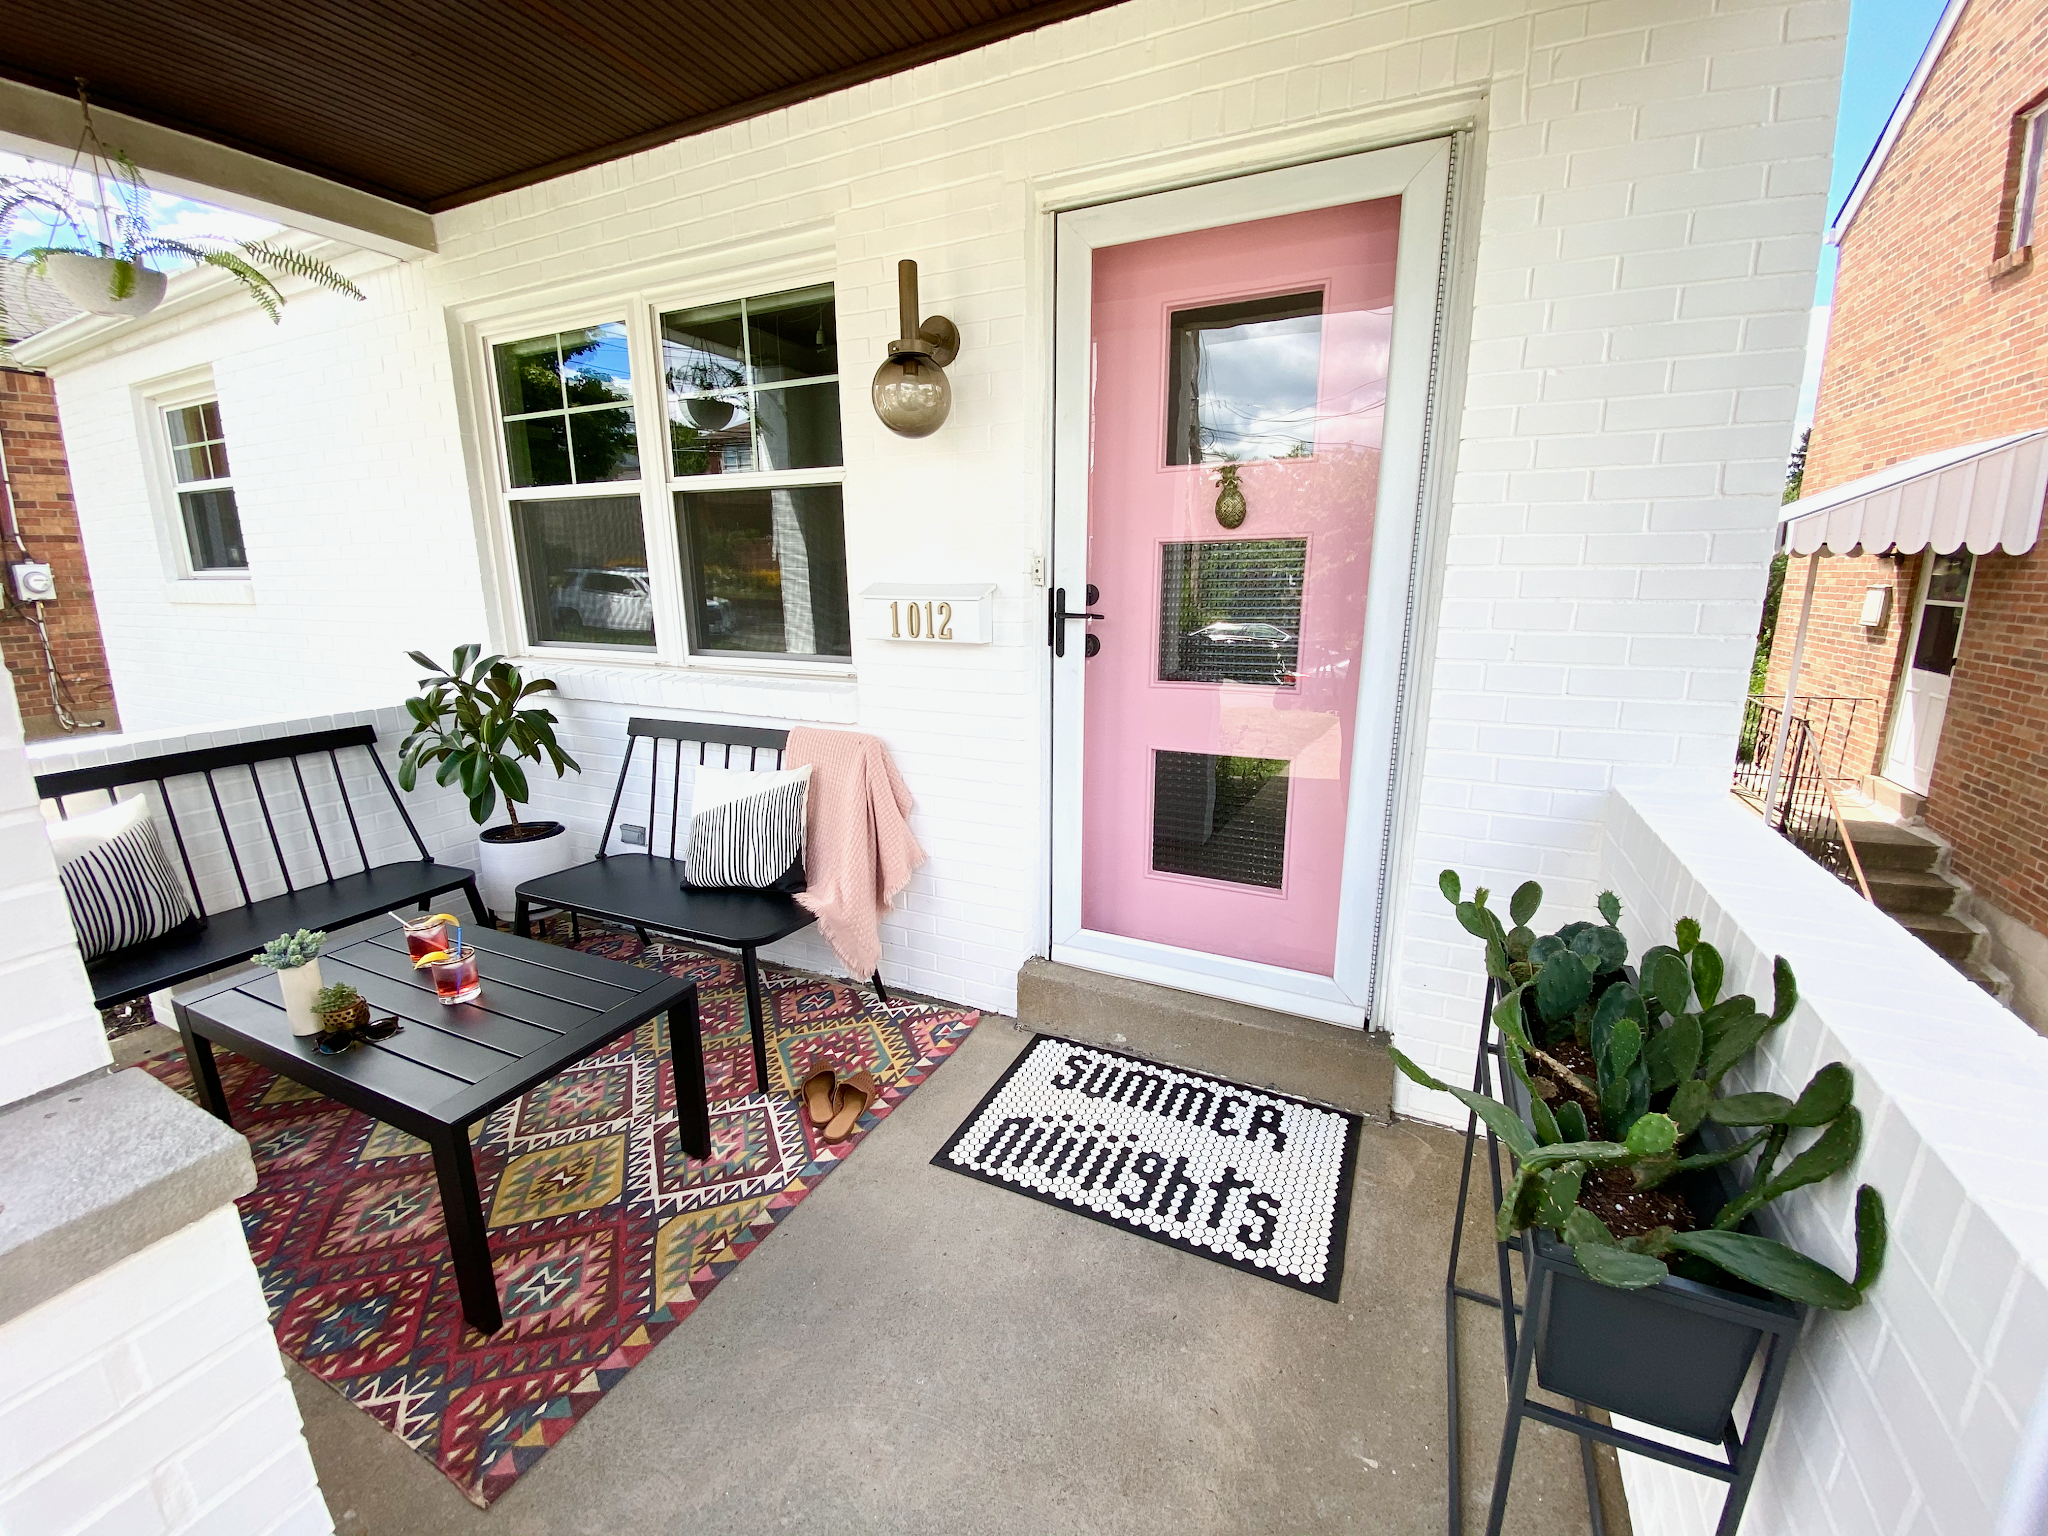
As I mentioned in the before & after, we were kind of guinea pigs for this project - I was not able to find other people online who have limewashed their house in solid coats and I wasn't sure what we could expect for years to come. Of course, we're only one year in so things will certainly look different again 3, 5, 7 years from now. Regardless, here is what we're working with! These are some pretty quick, unstyled snaps, of what the house looks like on an average August day.

How is the limewash holding up?

Overall, I would say that the limewash is holding up at a 9/10 - anyone driving or walking by our house would not notice any wear and tear to the paint job. Of course, I see my house closer than anyone else, and I can spot all of the issues where I see the limewash has worn away. Those issues are primarily with our porch, and we think there are a couple reasons for that.

1) The ledges of our porch are the only places where we applied the limewash to a horizontal surface. The limewash is designed to go on vertical surfaces, so it makes sense that these flat areas would experience more wear and tear than the rest of the house. During the holidays, we decorate the ledge with pumpkins, our fake Halloween skeleton, etc. and having something on these surfaces that can rub at the limewash has caused some wearing away.

2) This is total speculation on our part, but we think that potato bugs/roly polies/pill bugs (whatever you want to call them) have been eating the limewash. We have a lot of potato bugs in the flower beds around our house, and during/after it rains, we find a lot of them inside our front porch, both on the ground and on the inside walls. The areas where there have been high concentrations of potato bugs are the same areas where there is no longer limewash. I haven't been able to find anything to prove my theory, but I am convinced that the bugs are eating the paint.

Again, these areas where we've noticed issues are things that we notice because we live here, and you can only see them when you're on our porch. We personally don't think they detract from the overall transformation of painting our house. 

Would you recommend the Romabio Limewash over the Masonry Paint?

My short answer is no - like we mentioned in our original post, we would have preferred to use the masonry paint, but it wasn't available in our area when we started this project. To be clear, the masonry paint is the correct paint to use for a project like this because limewash is not meant to be painted in solid coats as we did. With limewash, you are supposed to slightly wash it away to give your brick an aged, rustic look. That style isn't for us, but since we couldn't purchase the masonry paint, we decided to give it a go with the limewash and hope for the best.

Do you regret using the Limewash instead of the Masonry Paint?

I would say I am at 90% no, I don't regret using the limewash. That lingering 10% is the part of me that doesn't want to have to redo something that could have been done correctly the first time. Unfortunately we can't know what our house would look like today had we painted it with the masonry paint last year, but I would probably feel better today knowing that we used the proper products.

Overall, I really do love how our house looks and I am glad that didn't we wait any longer to transform the exterior. We spent the first four years of home ownership working to update the interior of our house so that it better reflects our style and feels like home. The yellow brick exterior and bad landscaping didn't scream "Sarah and Nick" at all and we were so ready to make that change. We started this project in April 2020, shortly after COVID hit the U.S. and we realized that we were going to be spending a lot of time at home, away from friends and family, with not a lot to do. It was a project that kept us busy, spending time outside when we had no other reasons to leave the house, and was ultimately so fulfilling once it was finished. So for the most part, no major regrets.

Do you think you'll have to repaint your house in a few years?

I truly have no idea. Like I mentioned before, this is just the one-year checkup and while things are still looking pretty good now, I'm not sure how the limewash will hold up for the next several years. If we decide that the house looks bad enough in a few years and that it will need to be repainted, I think that I would be okay with that. Our total investment in this project was a few months time (where we wouldn't have been doing much else due to COVID), and about $1,300 in supplies. I don't think I will regret spending that time or money - the joy in seeing our house painted white for as long as it holds up will be worth that investment.

What's the status of your other outdoor updates?

We added an outdoor sectional to the concrete slab patio in the back, but we have not yet added a privacy fence or anything, and we're currently undecided on exactly what we want to do with the space. Since material costs have been on the rise for the past year or so, we decided to not rush into anything this summer and we are going to live with the patio and outdoor sectional as-is for a little while longer before we make any changes.

We were surprised to see just how much the Baptisia australis (False Indigo) grew this year. While we think it's so beautiful, it's kind of overtaking the Butterflyweed and the Creeping Phlox and barely giving them any room to flourish. We also have some peonies in the front of the house, but we think they just aren't getting enough light to grow. Come fall, we plan to move some of the plants to different areas and hopefully that will help them grow better next spring - fingers crossed.

All in all, we have a lot left to do to further improve our outdoor space, but we're just going to take things slowly until we can figure out exactly what will work best for us in the long run.


So that's a little one year later recap! Nothing fancy and no pretty staged photos - just wanted to share where things stand now in case you're thinking about painting your home as well. Below I'll reshare our product sources from our original post, but be sure to leave a comment if you have a question on anything!

Romabio Bianco White Limewash - Home Depot
Romabio Masonry Paintbrush - Home Depot
Medium Paintbrush - Home Depot
Small Paintbrush - Home Depot
5 Gallon Buckets - Home Depot
Paint Stir Drill Attachment - Home Depot
Outdoor Caulk - Home Depot
Mortar Repair Sealant - Home Depot
Pressure Washer - Home Depot
Black Metal Porch Bench - Target (no longer available)
Black Metal Coffee Table - Target
Rug - Urban Outfitters (old, no longer available)
Black Metal Planter - CB2
Porch Light - Thrifted (similar)
Front Door Color (Glidden, Pink Carnation) - Home Depot
Pineapple Door Knocker - Anthropologie (no longer available; similar)
Rekeying Kit - Home Depot
Door Knob - Home Depot
Deadbolt - Home Depot
Doormat - Letterfolk
Landscaping - Ashton Landscaping
Plants - Shadyside Nursery

Thanks for reading,
Sarah & Nick
x

If you've followed along with this blog or my Instagram for some time, our living room is likely a space you're not unfamiliar with. It makes a lot of appearances as its the center of our house, however, it's never gotten a dedicated blog post of its own because we never really considered it "done." But as we approach five years of living in our home, I think we've made it... the living room is finally DONE (for now at least.)

So this post is all about our living room evolution over the time we've lived here and where things have landed now. We spend a LOT of time in this room and we're pretty happy with how things are looking currently, so we hope you do too!

First, the VERY beginning - I guess we'll call this Phase 0. We were lucky to have a pretty blank slate to work with. Our initial plans were to 1) Add bookshelves along the back wall, 2) Replace the wood doors in the hallway with glass doors, and 3) Replace the reddish trim that exists throughout the house. Overall though, not a bad starting point!


Phase 1 - Looking at this era of the living room is pretty wild because it feels very far removed from our current design style, and this was only ~5 years ago. We added a pink rug for a bright pop of color, a neutral gray sofa, and a nine-bulb chandelier that we affectionately(?) called the Arby's Heat Lamp because it made this room WARM. The art above the sofa is from Etsy - I printed these as colored engineering prints, which is still a trick I use from time-to-time. It tends to work better for busy prints with a lot of colors/textures, otherwise you may notice the quality of the paper more easily with a solid color.

We built the bookshelves during our first winter in the house (you can see the full post here.) We wanted to make them look built in with the white trim that we're using to replace the existing trim, but you'll notice that we didn't replace any of the other trim at this time. When photographing this room, I often kept the shots pretty tight so you couldn't see that red trimmed doorway 🙈. I had really wanted floor-to-ceiling color coded bookshelves for a long time, so having this project come to fruition made all of my new homeowner dreams come true.


During this phase, we also added the white console table in the entryway, a mirror for last minute checks before heading out the door, and some small plants on a picture ledge. The typewriter on the table is probably the oldest thing in our house - it was my grandmother's from when she was a stenographer and we believe this model is from the early 1900s.


Phase 1.5 - I hesitate to give this a full phase because both changes during this period were pretty short-lived. After living with the pink rug for some time, I decided I wanted something a little less bold in here. We went with an white shaggy rug, which we still have in here today. You'll notice that during phase 1, we also added some cute kittens to the mix, and they had turned our gray sofa into their dedicated scratching post. We were already feeling unhappy with the gray sofa anyway, so we decided to switch it out with a faux leather sofa that we love. With a new sofa came new artwork above it, but these engineering prints didn't last long due to the quality of the paper (see issues mentioned above.)


Phase 2 - I love phase 2 because it means HALLWAY MAKEOVER. Like I mentioned earlier, we had planned to replace the existing hallway doors with glass doors but ultimately decided that we'd prefer to not shut off the back half of the house if we don't need to. We ended up taking down the wall and instantly the room and hallway just felt bigger and more open. We have a whole post dedicated to the hallway makeover that you can read here, but I'll add that by this point, we had already worked on the music room, the bedroom, and the bathroom, so it just felt really good to have the hallway feel like an extension of those completed spaces.

Around this time, we also swapped out some different artwork above the sofa and added a new chair to round out the sitting area. We also decided to say goodbye to the Arby's Heat Lamp and go for something a little more natural with this bamboo pendant shade. We honestly don't use this overhead light much to begin with, but we're much more likely to use it now that there's just one bulb as opposed to NINE. Lastly, we really didn't change anything about the bookshelves except probably add more books!


Phase 3 - At this point we're about 10 months into a global pandemic, I've barely left my house in that time, and I'm just ready for a bit of a refresh. I decided that I'd like to spruce up this room a bit with some new pillows, a new lamp I was coveting, and a new end table to help fill out the space since our coffee table is rather small.

I get all of my new purchases in and realize that it's just not looking... right. The art above the sofa isn't matching the vibe of the new lamp, so I decide that I'll make some new artwork for above the sofa. We'd been living with the two large white frames for over 4 years, so we switched to three black frames to tie in with the new black end table. Then of course, the color coded books seem to really clash with the artwork... so we decided to reorganize the books, to the shock and dismay of many according to my Instagram poll. I love the color coded books and I still do, but I'm also really into this more neutral palette where the colors are dispersed throughout. We're really happy with the change, and it better suits the new pieces we decided to add to this room.

Around this time, I also removed the letterboard and yellow books from the entryway table and instead added a cloth storage box, a little marble sculpture, and some eucalyptus for a bit of greenery. It just felt more simple and calming to me, which is perhaps exactly what I needed in the midst of the pandemic. We also (finally) replaced the reddish trim on the wall behind the sofa and entryway table and gave the walls a fresh coat of paint. It's a pretty minor change, but it was always holding me back from calling this room "done" so checking this off the list actually felt major for me.


Phase 4 - And that all brings me to phase 4, our final phase (at least for now!) With all of the changes of phase 3 really making this room feel closer to done than ever, we wanted to make that final push to actually call it done in our book. For us, that meant a new, larger coffee table that would better fit the size of our sofa, a new tray for on the coffee table, and some other textile upgrades, like a couple more new pillows and a blanket I knitted. I think the white coffee table is the one item that was a constant in our living room from the beginning - it was a small DIY we made way back in our old apartment. It served us well, but it was time for an upgrade. So here we go, after ~5 years of living room evolution, our current and complete living room!


Thanks for coming along on this ride with us! It's pretty wild how much things change in a relatively short amount of time. Do you have a favorite phase of our living room? I love our current phase very much, but I think I'll always love a color coded bookshelf as well. I'll link as many sources as I can below - of course, some items from earlier phases may no longer be available. If I missed anything, let me know!

Wall Paint (BEHR Ultra Pure White) - Home Depot
Door Paint Color (Glidden Pink Carnation) - Home Depot
Gray Sofa - Interior Define
Tan Faux Leather Sofa - AllModern
Bookshelves - IKEA (Read about how we installed our bookshelves here)
White Shag Rug - Amazon
9 Bulb Ceiling Light - Target
Bamboo Ceiling Light - IKEA
Entryway Mirror - Target
Terrazzo Knobs - H&M
Green & Pink Wall Art - Etsy
Blue & Orange Wall Art - Etsy (Print 1, Print 2)
Gold Floor Lamp - Target
Wood and Fluted Floor Lamp - Crate and Barrel
Rattan Chair - IKEA (similar)
Black Metal End Table - AllModern
Small Ceramic Vase - H&M
White Coffee Table - DIY (See post here)
Oak Coffee Table - IconByDesign
Black Coffee Table Tray - CB2
Cream Arch Pillow - H&M (no longer available)
Pink and Red Pillow - West Elm
Black Velvet Corner Pillow - West Elm
Pink and Cream Arch Pillow - West Elm


Thanks for reading!
Sarah & Nick
x

We recently completed our guest bedroom/home office and we're excited to finally share the before and after photos of the space with you. When 2020 started, we had no plans to work on our guest bedroom, let alone create a home office, but suddenly it became pretty essential when I started working from home full-time. Our guest bedroom is the last untouched space on the main floor of our house other than our kitchen, and it's about the same size as our main bedroom (which is also pretty small.) We weren't using it for anything other than to house Nick's clothes and a guest bed, but it was admittedly a pretty sad place for guests to stay.

Over the years I had started to brainstorm design ideas for the guest bedroom to keep in my back pocket, but those plans pretty much went out the window when we decided to incorporate a home office into the space as well. I worked from our living room for about the first six months of the pandemic, but having a desk in our living room felt a bit intrusive and was a bit of an eyesore in such a public area of our house. 

Our big project last summer was painting the exterior of our house, so while we were working on that, I started thinking about what our new guest bedroom/home office was going to look like. Since we couldn't dedicate time to both projects at once, I decided to make a moodboard with my thoughts for the space so that I could see how things looked together. This was my first time making a moodboard and it really helped me get excited to work on this room and actually plan things out a bit in advance.


We finally started working on this room once the exterior painting was finished, around late August. As with our other room renovations, we started this project with the messy task of resurfacing the walls with a lot of skimcoating and sanding. Eternally grateful to Nick for taking on this task because it is no fun at all. Next we primed and painted the walls with our go-to paint - BEHR Ultra Pure White. Once all of the walls were painted we installed and painted new trim, and finally we had a clean, blank slate to work with.


Since the room is small, we get the most usable floor space if we have the bed pushed into the corner. Though that's not really typical of a queen bed, I thought it could be cool if we made it seem kind of like a queen daybed, so we made our own wraparound built-in headboard. I was inspired by two separate ideas from Emily Henderson's blog - Emily Bowser's wraparound velvet headboard for the style, and Brady Tolbert's headboard for the color. I actually purchased the same fabric that Brady used and I love it so much in person. To create the headboard panels, we made wooden frames rather than using plywood and it made the headboard pretty light and easy to hang. It's just resting on nails and tucked behind the boxspring so that it doesn't move. The platform bed frame I purchased ten years ago when I graduated from college and moved into my first apartment. It's nothing special, but it does the job and I'm glad we've kept it all these years. The simplicity of it really allows the wraparound headboard to shine.

When gathering the other decor items and textiles for the room, I went with a combination of bigger stores, small businesses, and DIYs. To save on floor space, we built a little nightstand shelf with a pretty narrow profile so that I don't bump into it while working. I also knitted the magenta blanket at the foot of the bed, which sent me on a journey of knitting nearly ten blankets over the fall and winter. I hadn't knitted much in a long time, and it felt very good to create something that prevented me from staring at my phone. Above the bed is a wire sculpture I found on Etsy - there are a few different framed prints in the room, so for above the bed I wanted something a little more sculptural. I painted a pink square behind it to make it pop, and it's one of my favorite things in the space.


We're still using the IKEA Malm dressers, which work great for us. They work perfectly with the drawer dividers that I love, so we can make full use of the dresser space for Nick's folded clothes. In this corner we also hung a beautiful print called Lift from Juniper Print Shop, added a brass lamp, essential oil diffuser, some magazines (for future guests to read), and plants that enjoy this room's natural light. In the closet, we built out a system for Nick's hanging clothes, along with space to keep our hampers. We installed bifold doors that we added the trim boxes to, using the same technique that we've used so many times now - you can see the tutorial here.


For my desk, I wanted to recreate this easy desk idea from Paper & Stitch using the IKEA Ivar cabinet. We only had enough space to use one cabinet, so the other end of the desktop is attached to the wall with support brackets. I really love the clean lines of the deks, and it's nice to keep my computer tower and wires hidden in the cabinet. We cut out space in the back of the cabinet to thread the wires through, which provides some room for air to flow and prevent the tower from overheating. We also added a vent on the side for added air flow, just in case. We also use the cabinet to house our personal MacBooks, pens/pencils, envelopes, and all other desk supplies we seem to accumulate.


Above the desk we added a shelf to house some art and decor, as well as a flip clock that I bought early in the pandemic and really love. Luckily this room gets pretty nice light, so we hung a fern in the corner by the window and it's grown so much over the past year. On my desk we also have some small lemon trees that were gifted from my mom, and our pride and joy - our monstera. I can't wait to see how big it gets in years to come! Behind the monstera is another Juniper Print Shop print because you'll find Juniper everywhere in our house (sadly this print is no longer available.)


I've been working from this room about six months now and it's truly been a blessing to have a dedicated space to work during the pandemic. I'm also glad that it's given us a reason to utilize this space more than we would have. Our house is probably pretty small to many people (~1,200 sqft), but honestly doesn't feel that small to us, especially when there are rooms that we're not really using that much, like this guest room. It feels good to take full advantage of this space in our house and it's made our home feel just a little bigger in a time when I'm not seeing much outside these four walls. Can't wait for the day we can have some vaccinated guests make use of it too!


Here are the sources for everything (but if I missed something, please let me know):

Wall Paint (BEHR Ultra Pure White) - Home Depot
Bifold Closet Doors - Lowe's (Trim DIY)
Hampers - Goodee
Dresser - IKEA
Dresser Drawer Dividers - Amazon
Hand Print (Lift) - Juniper Print Shop
Gold lamp - Target
Dresser Tray - West Elm
Essential Oil Diffuser - Target
Window Shades - Home Depot
Black & White pillow - Jungalow (no longer available)
Orange & Magenta shag pillow - Jungalow (no longer available)
Cream textured fringe pillow - Ecovibe (no longer available)
Gray linen pillow - West Elm
White Quilt - Target (no longer available)
Magenta blanket - DIY (knitted with Bernat Blanket Extra yarn)
Headboard Fabric - Famcor Fabrics
Nightstand shelf - DIY
Bedside sconce - Matt Alford Studio (Etsy)
Wire lady art - SmithyShop (Etsy)
Desk cabinet - IKEA
Desktop - Lowe's
Desk chair - Poly & Bark (no longer available, similar here)
Triangle shelf brackets - Danish Design Store
Flip clock - Ecovibe (no longer available)
Full-length mirror - IKEA
Ceiling light fixture - Illuminate Vintage


Thanks for reading!
Sarah & Nick
x
Older Posts Home

HI THERE

We're Sarah & Nick. Here we like to talk about renovating our 1950s ranch in Pittsburgh, traveling the world, and the odds and ends in between.

SUBSCRIBE & FOLLOW

SEARCH

BLOG ARCHIVES

  • ▼  2021 (3)
    • ▼  August (1)
      • Our Painted House: One Year Later
    • ►  May (1)
    • ►  March (1)
  • ►  2020 (3)
    • ►  August (1)
    • ►  April (1)
    • ►  February (1)
  • ►  2019 (3)
    • ►  December (1)
    • ►  June (1)
    • ►  April (1)
  • ►  2018 (7)
    • ►  December (1)
    • ►  October (1)
    • ►  May (1)
    • ►  April (2)
    • ►  February (2)
  • ►  2017 (28)
    • ►  December (3)
    • ►  November (1)
    • ►  October (1)
    • ►  September (3)
    • ►  July (2)
    • ►  June (1)
    • ►  April (2)
    • ►  March (6)
    • ►  February (1)
    • ►  January (8)
  • ►  2016 (49)
    • ►  December (3)
    • ►  November (5)
    • ►  October (4)
    • ►  September (4)
    • ►  August (4)
    • ►  July (3)
    • ►  June (4)
    • ►  May (2)
    • ►  April (5)
    • ►  March (4)
    • ►  February (7)
    • ►  January (4)
  • ►  2015 (36)
    • ►  December (5)
    • ►  November (4)
    • ►  October (3)
    • ►  September (2)
    • ►  August (6)
    • ►  July (3)
    • ►  May (2)
    • ►  April (3)
    • ►  March (2)
    • ►  February (4)
    • ►  January (2)
  • ►  2014 (36)
    • ►  December (6)
    • ►  November (5)
    • ►  October (3)
    • ►  September (3)
    • ►  August (4)
    • ►  July (2)
    • ►  June (3)
    • ►  May (1)
    • ►  April (2)
    • ►  March (4)
    • ►  February (2)
    • ►  January (1)
  • ►  2013 (1)
    • ►  November (1)
© Creative Worker Bee. Powered by Blogger.

DISCLOSURE

We participate in various affiliate advertising programs. If you click or make a purchase through select links on this site or related social media accounts, we may receive a commission. Although we participate in these programs, we're committed to keeping this blog 100% us - all opinions are our own.

Copyright © Sarah & Nick. Designed by OddThemes